Designing for Assembly Before Finalizing Design
How early mechanical decisions reduced assembly complexity.
One of the most common mistakes in hardware development is treating assembly as something that happens after design. In reality, assembly starts the moment the first CAD sketch gets drawn. A product can be mechanically sound, aesthetically refined, and functionally complete, and still fail to scale if it's hard to assemble consistently. Every extra screw, alignment step, bracket, or manual adjustment adds assembly time, introduces variation, and opens the door to defects.
While developing Everbowl at Hoomanely, we found that some of the most valuable engineering improvements didn't come from adding features, they came from simplifying how the product went together. Designing for assembly early, before the design was finalized, cut complexity, improved repeatability, and gave us a system that could be built reliably across multiple units. This post covers how early mechanical decisions shaped downstream manufacturing, why assembly deserves to be treated as a design parameter, and how small architectural changes can meaningfully improve production readiness.
The problem: assembly was becoming a hidden risk
Early prototypes are usually assembled by the same engineers who designed them, and because the designer already knows part orientation, assembly sequence, critical tolerances, and hidden constraints, the product looks easy to build. Hand that same design to a different assembler, technician, or manufacturing partner, and problems start to show up: ambiguous part orientation, difficult fastener access, too many assembly steps, alignment-dependent installation, and more rework during final assembly.
For Everbowl, these issues surfaced as we moved from individual prototypes toward building multiple complete systems. The design worked, but assembly depended too heavily on the operator already knowing what to do.
Why designing for assembly matters
Assembly complexity directly affects product consistency. Every manual operation introduces variation, alignment differences, small relative movement between parts, positioning errors, and less assembly complexity generally means less variability. It also affects reliability: many field failures trace back to incorrect assembly, misalignment, or improper fastening, and a design that assembles consistently tends to perform consistently too.
Designing assembly into the product
Rather than optimizing assembly after the design was locked, we started evaluating every design decision against one question: how will this affect assembly? That changed how components were designed, connected, and integrated. Instead of focusing only on functionality, we weighed the number of assembly operations, the assembly sequence, accessibility, error-proofing, and serviceability.
Engineering changes that reduced complexity
Reducing part count: every additional component needs manufacturing, inventory management, inspection, and assembly, and many early designs carry parts that solve a local problem while adding overall complexity. We looked for chances to combine functions into single components, remove redundant brackets, and build alignment features directly into structural parts. Industry data shows reducing part count tends to lower assembly time, manufacturing cost, and the number of ways things can go wrong. A simpler architecture is usually a more reliable one.
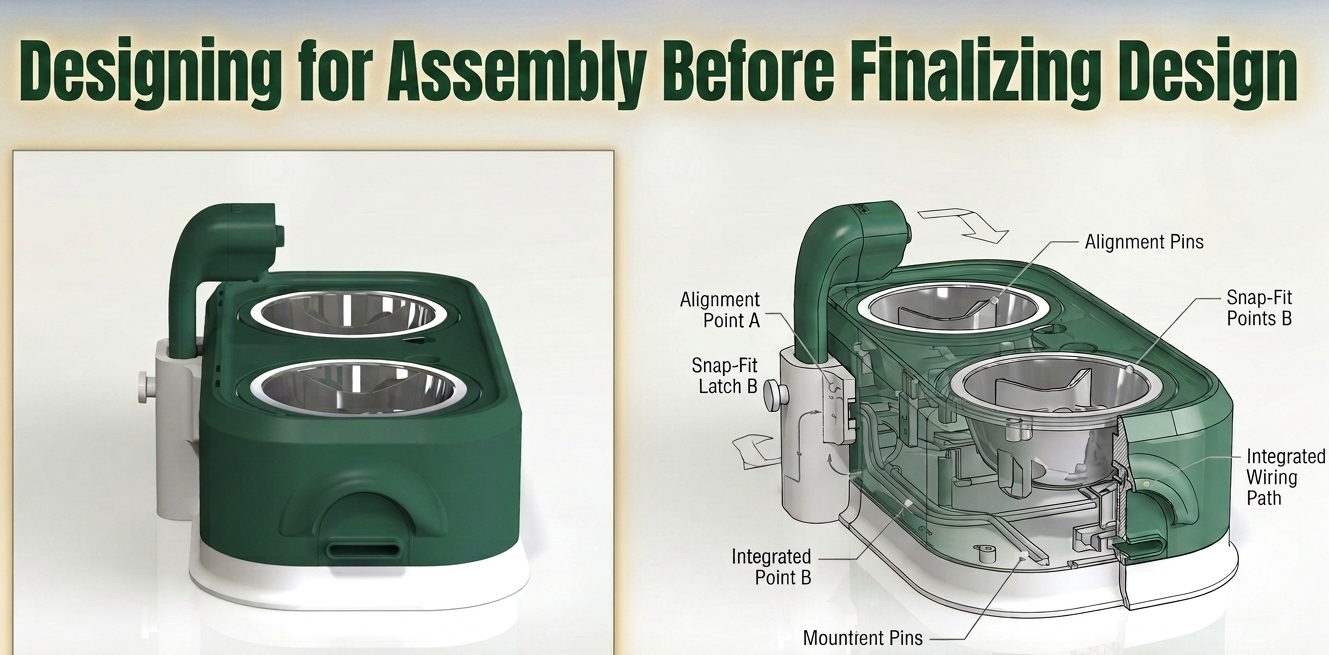
Self-locating features: manual alignment is one of the biggest sources of assembly variation. Early assemblies often need an operator to hold components, line up holes, and maintain positioning while fastening, which invites inconsistency. We introduced locating bosses, registration features, alignment tabs, and guided interfaces so components could naturally find their own position during assembly. That gave us faster assembly, fewer alignment errors, and more consistent geometry.
Improving fastener accessibility: fasteners that are hard to reach mean longer assembly times, improper torque application, and frustrated operators. We evaluated fastener locations for tool accessibility, installation sequence, and serviceability, which cut assembly friction considerably.
Designing around threaded inserts: repeated assembly and disassembly were expected throughout development and testing, so instead of relying on plastic threads, we used threaded inserts. That gave us consistent clamping force, better durability, faster reassembly, and less rework from stripped threads.
Measuring assembly performance
Assembly improvements should be measured, not assumed. Assembly step count, the total number of individual operations like placing a component, inserting a fastener, torquing it, and connecting a cable, is one useful metric; fewer steps generally means better efficiency. Assembly time reduction, calculated as the percentage drop from initial to improved assembly time, is another; even a modest reduction can have a real manufacturing impact. Rework rate, the percentage of units needing correction, is a third; a high rate usually points to poor assembly design, ambiguous interfaces, or tolerance issues, and cutting it is one of the clearest signs of product maturity.
Everbowl's assembly evolution
As Everbowl moved from prototype to production-ready hardware, assembly considerations started influencing the architecture directly. Early on, the design had multiple alignment-dependent components, extra fastening operations, and manual positioning steps during assembly. It was functional, but these features added build complexity.
We reduced unnecessary components, added self-aligning mechanical features, improved fastener access, standardized fastening methods, integrated threaded inserts, and simplified the assembly sequence. The resulting system was easier to assemble, less dependent on operator skill, more consistent between units, and easier to service. Most importantly, assembly became predictable: a product isn't really finished being designed until it can be assembled consistently by someone who didn't design it.
A lot of engineering teams optimize functionality while overlooking manufacturability, but assembly is really one of the most important user experiences a product has, except the user in this case is the manufacturing team. Adding brackets, spacers, and fixtures often fixes a local problem while creating complexity at the system level. Assembly sequence should shape design decisions from the start, not get treated as a downstream manufacturing concern to sort out later, since by the time manufacturing begins, a lot of the opportunity for simplification is already gone.
Where this is headed
Modern product development increasingly builds in formal Design for Assembly evaluation, covering part count, fastener count, assembly direction, and tool requirements. Digital assembly simulation is also becoming common, letting teams validate assembly sequence, tool access, and operator movement before physical production starts. And products in general are trending toward fewer components, multifunctional parts, and simpler assembly workflows.
Hoomanely context
At Hoomanely, assembly is treated as a core part of product architecture rather than something that happens downstream in manufacturing. What we learned developing Everbowl reinforced a simple principle: every decision made in CAD eventually shows up on an assembly bench. Designing for assembly before finalizing the product cut our complexity, improved repeatability, and gave us a sturdier foundation for scaling production later.
Key takeaways
- Assembly should be considered during design, not after.
- Reducing part count often improves both reliability and manufacturability.
- Self-locating features cut down assembly variation.
- Fastener accessibility has a real effect on assembly efficiency.
- Threaded inserts improve durability and reduce rework.
- Assembly performance should be measured with step count, assembly time, and rework rate.
- Simpler assemblies tend to be more scalable and more reliable.
Conclusion
One clear sign of engineering maturity is recognizing that products are effectively built long before they're physically assembled. Every bracket, fastener, alignment feature, and interface carries an assembly cost. Made intentionally, those decisions make assembly faster, simpler, and more reliable. Ignored, they accumulate into delays, defects, and rework on the production floor. The most successful products aren't just designed to function. They're designed to be built, and often, the easiest products to assemble end up being the most reliable ones to ship.